Flight Center - for the Yuneec ST-16 and Typhoon H
The homepage for Flight Center is here: http://www.feertech.com/flightcenter.html. Click the link for information and downloads.Mission Editor Guide
 (Please note, this guide uses the term 'focal point' to mean the point that the camera is centered on rather than focus adjustment)
Basic Editing
Tap on one of the Mode Icons on the left to chose an edit mode. When you first create a mission, you must select a takeoff point, so takeoff mode is selected - just tap on the map where you plan to fly from. The Typhoon will reset it's altitude to zero at takeoff and all waypoint altitudes are relative to that point. You can move the takeoff point at any time, and so long as you take off from somewhere at roughly the same height, the Typhoon will fly the same path. After choosing a takeoff point, you are in 'Add Waypoint' mode. Tapping on the map will add the next waypoint and select it. Keep tapping to add more waypoints. To move a waypoint, tap the 'Move' mode icon. When you tap on the map, the selected waypoint will move to that location. To set the Typhoon's yaw, select 'Yaw' mode. The selected waypoint(s) will turn to face the location you tap on the map - this is the direction the Typhoon will face at that waypoint. To set the camera's focal point (the point that it looks at), select 'Focus' mode. Now when you tap on the map, the selected waypoint(s) will turn the to face the chosen location and the camera pitch will also be set (so the camera will look 'down' to view points near to the Typhoon, and 'up' if they are further away). All changes you make to a mission are remembered (even if you quit the App). Tap Undo or Redo to undo and redo them. When one or more waypoints are selected, tapping Delete will delete them.Selecting and Adjusting
By default, the Mission editor has 'Quick Select' enabled (the checkbox at the bottom right of the screen). If Quick Select is enabled you can select a waypoint regardless of which mode you're in just by tapping it on the map. Normally you are in 'single selection' mode, where only one waypoint will be selected at a time. Tapping on the select mode icon will change to 'multi selection' mode. Now you can select many waypoints - just tap on each waypoint to select or deselect it. In 'multi selection' mode, when you add a waypoint, it will be added to the selected set of waypoints. This makes it easy to adjust a set of waypoints together. If you find yourself selecting waypoints unintentionally (for instance when placing them close together), or moving/adding waypoints when you want to select, then disabling Quick Select will help. With the box by 'Quick Select' unchecked, waypoints are only selected by first tapping the select mode icon to go into select mode. Tap the icon a second time to go into multi selection mode. When a waypoint is selected, you can see the yaw and gimbal pitch at the bottom of the screen, and the height to the right of the screen. You can adjust the gimbal pitch with the slider, and the yaw and height by tapping the number to edit them. You can also 'bump' the height up and down by tapping the arrows above and below the height display. If multiple waypoints are selected, changing the gimbal pitch will change the pitch to the same value for all selected waypoints. Similarly, editing the yaw or height will set them all to the same height. If you select multiple waypoints with different heights, the height value will be shown in cyan. You can use the 'bump' arrows to adjust all of the points up or down relative to each other.Camera Estimation and Focal Points
The mission editor knows about the lens and camera modes for the Typhoon H. It uses that information to estimate the field of view for video and photographs. You can turn view estimation on and off using the dropdown in the bottom right of the screen. The editor also uses the camera information to set the focal point for new waypoints. You can select which focal point is used with the drop down on the bottom of the screen. The default is 'Takeoff' - each new waypoint will focus the camera back to the takeoff point. 'Direction' will set each new waypoint to face in the direction of flight from the last waypoint. 'Viewpoint' will focus on the most recent focal point set by the user (in 'Focus' mode), or the takeoff point if none has been set. 'Match last' will set the new waypoint to face in the same compass direction as the last. By default, view estimation is shown for all waypoints. You can choose to show it only for selected waypoints or not at all. When looking downwards, view estimation shows the area of ground covered by the camera with a gray 'rectangle'. Note that this assumes level ground and should only be used as a guide. When looking further away, the ground display is disabled, but approximate view lines are shown in blue radiating from the waypoint. The green line shows the direction the camera faces, or 'up'. You can change the camera lens/mode with the drop down on the right. The Typhoon video mode produces a 16:9 display, whereas photo mode uses a slightly wider 4:3 display.Flight Path
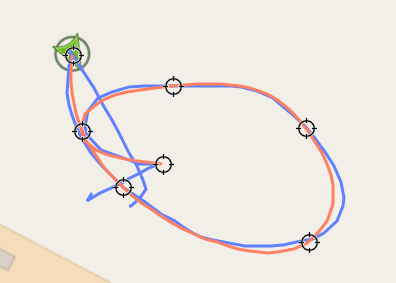
Estimated flight path (in red) compared to flown path (in blue).